

All this studying has really been cramping my style lately and I haven't been completing the mass quantity of DIY projects my little heart would desire. So instead of being studious this past weekend, I tackled a storage project for Kurt's apartment. He has this gradually expanding collection of pint glasses that he has, um, acquired over the years that has been taking up a lot of space in his cabinets. I'm typically not a huge supporter of bachelor pad chic, but if that's what we have to work with then you might as well have fun with it, right? (Although you won't be seeing any neon beer lights anytime soon. You hear me, Kurt?!)
After Kurt took me to my very first chiropractic adjustment (a story unto itself!) we ran by Home Depot to pick up a few supplies. I typically like to do projects solo but I figured it was time to train Kurt as my assistant. He has his handy moments and takes direction pretty well :) (He is also a stellar documentarian, so most of these images are from him.)
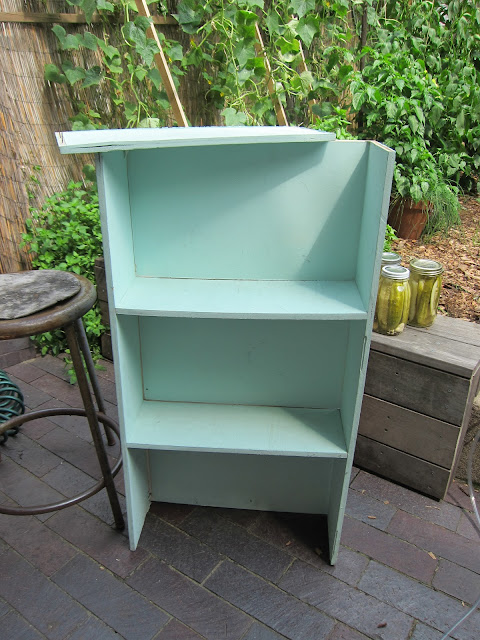
Well, months and months ago, Kurt and I found this shelf on the curb and I thought it would be perfect for a project Jenn was considering, so I made Kurt drag it home on the bus (see that awesome assisting already?). It didn't quite meet her criteria, so the shelf sat in their building hallway for a long time and we stashed bike helmets and random things on it. Jenn got tired of it junking up the hallway and finally created a superior helmet storage solution, rendering the poor minty green shelf useless. I asked her to keep it a little longer and I would find a use for it. And that's how the beer glass shelf was conceived.

The current piece wasn't in such great shape so I planned on cleaning it up and rearranging the elements a little. I hadn't really anticipated rebuilding the whole thing but it practically fell apart, so dismantling all the pieces, removing all the dinky finish nails, and reconnecting everything with screws was the only option. It's pretty sturdy now!

Will was an excellent peanut gallery. While I didn't give him any tasks, he had some great ideas that helped the project roll along a little smoother. Thanks, Will!

After the box was rebuilt and the center shelf was attached with L brackets, we drilled some holes for shelf supports that would be installed at the very end. Then the whole thing got two coats of dark grey paint.

The next step is my favorite! I laid out a pattern of wooden shims along the back panel of the shelf. I'm totally in love with these as a material! (I feel like I saw them used somewhere during my endless blog trolling but could not for the life of me find one to reference!) They are super cheap and easy to find at the hardware store. Plus, they add nice texture and natural tones. I hoped the pattern will be a nice backdrop to the beer glasses without overpowering them.


I left a couple rows of shims out so we could attach the shelf box to the wall. Its pretty impossible to find studs in Kurt's walls so we just put a boat load of screws in and hope we caught something! Then we added in those final rows of shims to cover the screw heads.

The final step was a piece of all thread and a few nuts that would keep the center shelf from sagging.

Overall we're pretty thrilled with it! Of course we could have filled in the old nail holes and countersunk all the screws for a cleaner look and been more patient by letting the glue dry instead of seeping down all the shims, but it's not bad for a single afternoon project. Kurt and Erik seem to like it and it's loaded up with glasses and hasn't come crashing off the wall yet! Let's hope it stays up there!

Thanks, Kurt and Erik, for letting me use your apartment as a testing lab for all my wacky ideas! One day I'll finish that bathroom of yours...
Great job! I need a corner shelf built. Are you available for hire?
ReplyDeleteI'm a happy client! Need more glasses!
ReplyDeleteOh, and thanks for credit for being a dedicated documentarian!
ReplyDeleteAmazing! You did such a good job with that - you should start making them and selling them! :)
ReplyDeletevery nice! i love the shims.
ReplyDeleteWOW what awesome DIy - it looks great and do-able :)
ReplyDelete